After recently making sushi with the girls, I realised that I still had an ample amount of the necessary ingredients to make some at home too.
So after another busy week, I thought a sushi evening at home would be just what Gav and I needed.
It was still a bit of a rush, as is this post I'm afraid. I will do an all singing all dancing sushi post another time.
This time I just made some rolls and sliced some sashimi.
First up you need to make the rice and you do need special sushi rice for this. It's incredibly sticky and perfect for holding sushi rolls together. You'll find it for sale in most Chinese supermarkets.
It needs to cook for about 15 minutes and once done, drain it and spread it out on a clean tea towel to cool. Don't rinse it under cool water as this will cause it to lose its stickiness. You could use a sushi rice marinade, and in fact I recommend you do. I didn't this time and I just sprinkled the rice with some rice vinegar and seasoned it. It was ok, but it missed the full marinade.
As the rice is cooling, put the fish (which needs to be absolutely fresh - from the fishmongers and not from a supermarket packet - although some fish counters are ok) into the freezer for about 10 minutes or so. You could use salmon, tuna or sea-bass, or whatever you fancy as long as it's fresh and has not previously been frozen.
Take the fish out and slice it into strips - say about a cm thick. Stick this back in the fridge to keep nicely cool. If you would rather not use raw fish, have a go with smoked salmon and cooked prawns. Salmon roe is also a favourite of mine.
Then get on with slicing some veg for the sushi. Again, make the slices about 1 cm thick. You could have carrot, avocado, pepper.... again anything you fancy.
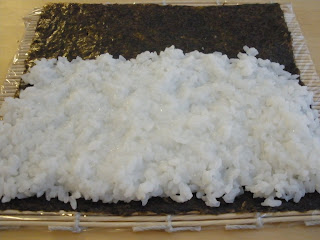
Once the rice has cooled, take a sushi rolling mat and cover it completely with cling film - both sides. Then lay a sheet of sushi nori (seaweed) on the mat.
Take some rice and spread it from the very bottom of the nori up so that about 3/4 of the sheet is totally covered. Pack it down with your fingers as it needs to be even. Also make sure the rice layers isn't too thick as this will cause serious problems when rolling.
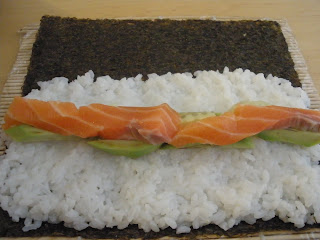
Then take strips of your filling and lay in a neat line, say about half way up the layer of rice.
Now for the tricky bit. Grab the bottom of the mat and roll everything upwards, away from you. Give it a good squeeze along the way. And then roll.
Not very easy to explain I'm afraid! Have a nosey at this for help - just ignore the music!
Once rolled, place on a chopping board and use a wet knife to slice. Make sure you wet the knife in between each slice as the rice will be really sticky. Chill the slices whilst you 'make' the sashimi.
Now sushi chefs train for years and are very skilled. There is no way I would ever even dare compete with any of them in terms of sashimi slicing (or sushi making for that matter). However, I am quite happy to use my skills at home.
Again whatever fish you are using, make sure it's fresh and then stick it in the freezer for 10 minutes or so (it just makes it easier to slice). I used salmon, tuna and scallops.
You then want to slice. Go against the grain (this helps with presentation and is essential with salmon as it ensures that the fat is evenly distributed throughout each slice) and slice 1/2 cm thick pieces.
Done. Far from traditional but good enough for a treat at home.
Serve with soy, wasabi and pickled ginger. Miso soup and a couple of glasses of fizz will also go down nicely with this.
Then, when you've realised just how much the ingredients have cost and that your kitchen is covered with sticky sushi rice, get to Wasabisabi or Sushi Express and give the real stuff a go!


No comments:
Post a Comment